-
Support Email
ticketservice@ticketgateway.com
-
Phone Support
Call: 1(877) 616-0101
How do I create / setup an event on TicketGateway?
🎟️ How do I set up an event on TicketGateway?Creating your event on TicketGateway is fast, easy, and completely self-serve. Whether you’re hosting a party, concert, brunch, or carnival event — here’s how to go live in minutes:
✅ Step 1: Log in or Sign Up
-
Go to www.ticketgateway.com
-
Click Sign In at the top right
-
Don’t have an account? Click Sign Up and follow the quick prompts 🧾
➕ Step 2: Click “Create Event”
Go to www.ticketgateway.com
Click Sign In at the top right
Don’t have an account? Click Sign Up and follow the quick prompts 🧾
Once you're logged in:
-
Click the Create Event button at the top of your screen.
-
You’ll land on the event creation form — this is where the magic starts ✨
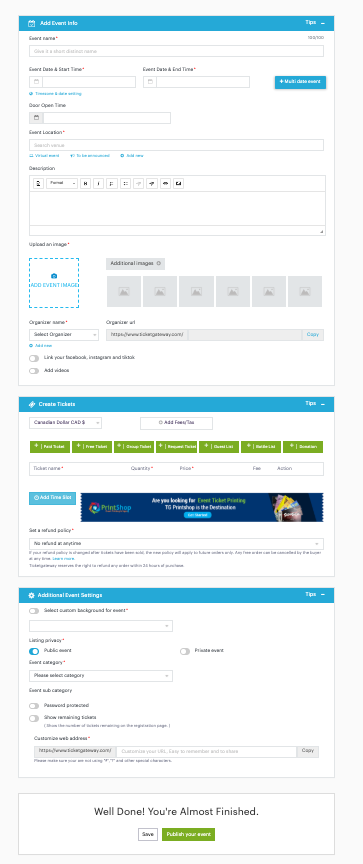
📝 Step 3: Add Your Event Info
Fill in all the key event details:
-
Event Name 🏷️ – Make it catchy and clear
-
Event Date & Time ⏰ – Select your start and end time
-
Location 📍 – Add a venue or select “Virtual Event”
-
Description 💬 – Give guests a reason to show up!
-
Main Image 📸 – Upload an eye-catching promo image
-
Additional/Background Images 🎨 – Optional, but great for branding
-
Organizer Info 👤 – Link to your site or socials
🎫 Step 4: Create Your Tickets
In the Create Tickets section, click:
-
+ Paid Ticket, + Free Ticket, or other ticket types
-
Fill in the following for each ticket type:
-
Ticket Name (e.g., “Early Bird”, “VIP Table”)
-
Quantity available
-
Price 💵
-
Sale Start & End Dates
-
Max tickets per order/user
-
Description (optional but helpful!)
-
-
Set your Refund Policy 🔁 (No Refunds, Contact Organizer, etc.)
📌 Pro Tip: Keep your ticket names simple and consistent — it helps avoid confusion during checkout.
⚙️ Step 5: Configure Event Settings
Under Additional Settings:
-
Choose a custom background image for your event page 🖼️
-
Set event visibility (Public or Private)
-
Select your event category (Concert, Festival, Brunch, etc.)
-
Enable optional features like:
-
“Download Required” 🎟️
-
“Show remaining tickets” 🔢
-
-
Customize your event link/URL (e.g., ticketgateway.com/your-event-name)
🚀 Step 6: Save or Publish
-
Click Save 💾 to save a draft (not live to the public yet)
-
Click Publish Your Event ✅ to go live and start selling tickets!
⚠️ Important: Hitting “Save” keeps your event private. Be sure to press “Publish” when you’re ready to launch!
🎉 That’s it — your event is now live!
You can log in anytime to make changes, track sales, or promote your event.
Need help? Email us at support@ticketgateway.com